Wednesday, November 25, 2015

Good things come to those who bake ~

Every time I talked about how I want to make my dreams come true there was something surreal about it. You fail to notice how with little steps you are everyday a step closer.


Ever since I had this idea about making food as my career change I had started my groundwork. Self learning, buying n numbers of cookbooks, watching YouTube, experimenting, whining, sleepless nights, talking endless even when no one is listening, you get the gist?


After four years, I did reach somewhere but not a place where I wanted to be. It came down to a point where I had to something about getting the right answers to the questions I seek.

The best way to fast track the whole thing was to go to school. The whole idea was so enticing; it had me vibrating with energy. But there was also this fear of stepping out of my comfort zone, which had me in jitters. I was to travel alone for the first time abroad and to the country that was never on my good list. All thanks to the indifferent people I used to work with in a multinational setup. 


Oh boy! Was I in for a ride? For the first time I thought how can I be so judgmental?
I was and I am ashamed of that. I met people who stepped out of their way to help me and I am so moved by that fact. I can never imagine anyone from my birth country doing that. Never!

On to the school, The School of Artisan Food was always my first priority because of the course structure and has been on my bookmark for years now. Anyhow the doubt that no one had heard about it and it was fairly new at that time I had to give the benefit of doubt and research about the other course.


Nothing can beat the course structure they are offering. It made so much sense to learn from the best and that’s what they provide. The humble staff I studied from was world rank holders and we always found out about it from the other horses mouth. Never the baker / horse himself. That speaks volume.

My time spent there was nothing but continuous learning and evolving myself. I started with self doubt of surviving in another country alone to making the most of my time there with lovely people and amazing food.


I kept myself busy with the number of courses they offered during my time there. I practically become a volunteer staff by answering questions of the first timers around and I loved every second of it.

Whenever we were in the class one thing was always predominant, to learn. Wayne often called them the building blocks, Mickael called it French baking. The whole emphasis of the course was to make sure we understand the science and art behind it and then work on the recipe. If we don't know what we are looking for the point of going to school becomes moot. They know what they are talking about.


I am sure my next recipes will be either from the big black book we earned at school or the inspiration I got while I was there. The catering staff was more than welcoming whenever I stopped at their station with my notebook and asking question about the amazing lunches they served the hungry bakers. I often wonder about the kind of pressure they must be under to produce and serve a bunch of bakers and world-class humble chefs sitting at one table together.


If you happen to be around the Welbeck estate, which houses the school, do stop by the opposite yard from the school building. That complex houses another gem which become my favorite in a short while - Welbeck Abbey Brewery


Yum

Sunday, June 14, 2015

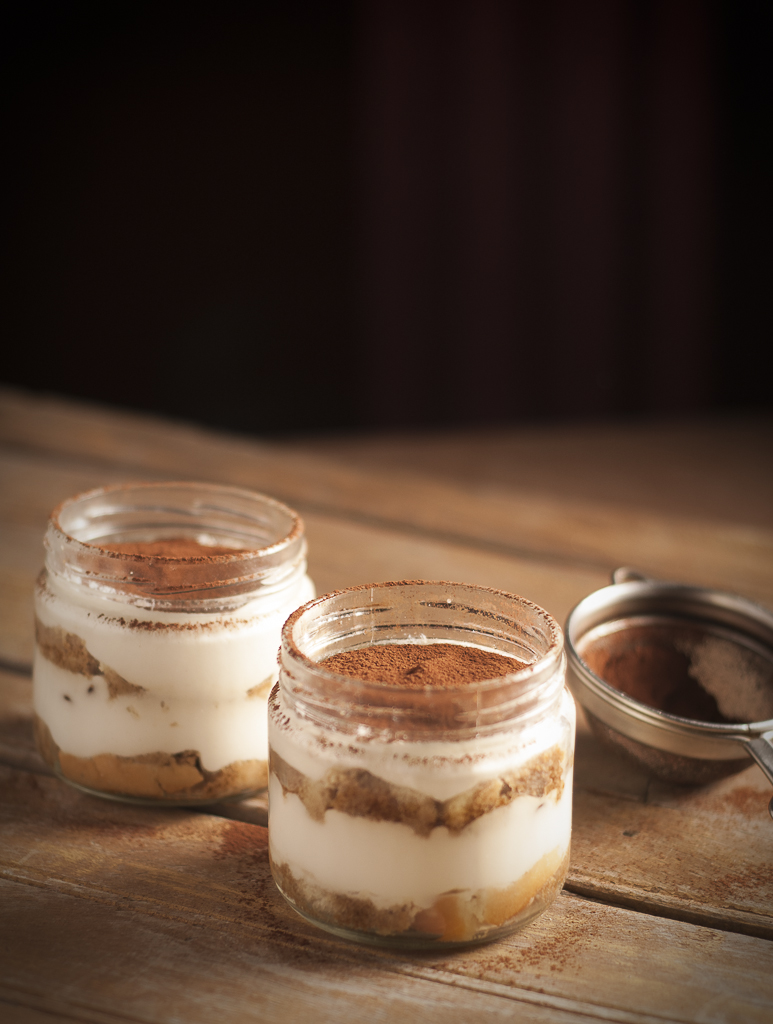
Tiramisu in a Jar

Today I am very happy! Not only because I finally tamed the untamed, but also because I am back after a 10 day vacation from my Sister's home in Bangalore. Punjabi loudness, the contagious high of her house is still prevailing in my mind.


I believe its going to be there for some time and I am right now full of ideas about what to bake next. I think the concept of moving out of your comfort zone to think 'How to's' of your life really work wonders.

The questionable untamed in this post is THE tiramisu. I've figured that every time I make this dish specifically for the blog, its throws up on me. This time I did not plan anything and just made it for my Birthday last month.


Since it was just two of us at home, I made only two jars. And considering the month of May and the soaring temperature in Delhi, I do not stay near the oven longer than necessary.


Recipe follows:

(Makes 2 jars - 250ml)

Vanilla Sponge Cake
200 grams of Mascarpone Cheese
100 grams Heavy Cream
2 Tbsp Condensed Milk (adjust to taste) or Desired Sweetness
1/2 Cup Black Coffee
1 Tbsp Kahlua or Brandy (Optional)
Cocoa Powder to Dust
Chocolate Chips (Optional)

Procedure:

To prepare the black coffee, add 2 tsp of instant coffee granules in about 3/4 cup of water and add desired sugar. I like it bitter so I added only about 3/4 tsp of granulated sugar and let it boil for about 10 minutes or until you have half cup remaining. Let it cool at room temperature. At this point you can add the liquor or your choice if desired.

Slice thin fingers of Sponge cake (about 1/2 inch) and layer the base in both jars.

Soak Sponge base with the black coffee and keep it aside.

On a slow speed, mix mascarpone cheese and condensed milk until its fluffy and smooth.

In another bowl whip heavy cream until it reaches soft peak stage.

With a light hand mix whipped cream to the smooth mascarpone mixture.

You can check the sweetness at this point and add more if required.

Spoon the mixture to the base and make another base layer by lightly adding more sponge on top.
dd coffee mixture to the same.

Its optional but you can add few chocolate chips to add a bite to your dessert.

Spoon cheese mixture again on top of the second base.

Refrigerate for minimum of 4 hours or overnight for the coffee flavour to set.

Dust cocoa powder on top before serving.

Yum

Thursday, May 14, 2015

Star Studded Chocolate Cupcakes (Eggless)

The only time that gets me rolling with ideas more elaborate is April. There is so much flutter and celebrations that all I want to do is feed people than sitting on a computer.


To start with, its my daughters birthday month and I try beat my best every year. Considering how she loves the sweet section of the party - it also becomes my area of concentration. To top that its also the month of our wedding anniversary.  ;)


This year I distributed cupcakes to her classmates instead of the usual candy bags. The kids were delighted. If 30 something bouncing kids around me to open the box faster was not enough, the shrilling yays was making the point very clear. It seemed the teacher was not very happy as I had her class turned into an amusement park within seconds.


The minute these kids sat down to taste their cupcakes, the hum and the quietness was enough proof that I had them all charmed.

These beauties were just perfection. Beautiful humped muffins with equally simple pink and purple stars.


The recipe was adapted from Dishes from my kitchen

Recipe follows:

3/4 Cup Cake Flour
3 Tbsp Cocoa Powder
1/2 Tsp Baking Soda
1/4 Tsp Salt
4 Tbsp Olive Oil
1/2 Cup Water
1 Tbsp Vinegar
1/2 Cup Granulated White Sugar
1/4 Tsp Instant Coffee Powder
1 Cup Whipped Cream


Procedure:

Preheat oven to 350 Degree F (180 degree C) and ready Muffin pan.

In a large bowl, whisk the flour, cocoa powder, baking soda, salt and sugar.

In a small bowl mix Olive oil with water, vinegar and coffee.

Mix wet ingredients into a large bowl of dry ingredients.

Do not over beat.

Pour the batter into the prepared pan. Makes about 6 muffins.

Bake for about 16 - 20 mins or until the toothpick comes out clean. 

Let the muffins cool at the room temperature before icing.

Prepare 2 icing bag with a large and a small star nozzle and decorate as per your idea.


Yum

Monday, March 23, 2015

Cinnamon Rolls & Babka Bread

Normally whenever I'm stressed or just under the weather, cinnamon helps me get back to my funk. I used to go to my all time favorite Banana bread and load it with cinnamon and sometimes dry ginger but ever since I have tried my hands on cinnamon pull apart bread, it is giving very tight competition to our good old friend.

Cinnamon Rolls

They are not just easy to whip along and if you plan in advance which I rarely do, they become your best companion during high tea, midnight snack and the next day morning tea partner. You get the gist?

Cinnamon Rolls

The only thing I really missed was the glaze. But since my family is right now going through overdose of sweetness in their lives, I tried to keep it calm and just kept them plain and simple.

Babka Bread

And because I just could not have enough, I also made this amazing Babka bread which I saw on pinterest and was intrigued by its twisting design. And to add Ozzy's interest to it, I bought in Nutella's help and it worked really well! Like really really well!

Babka Bread


The recipe was sourced from: Purple Foodie's Workshop

Recipe follows:

For the basic dough: 

794 gm Flour
9 gm Instant Yeast
425 gm Warm Milk
2 tsp Salt
80 gm Sugar
6 tbsp Vegetable Oil
1 Egg for the dough

for Rolls:

30 gm softened butter
2 tsp Cinnamon
60 gm Caster Sugar
Icing sugar for dusting {or make a glaze}

for Babka bread

30 gm softened butter
2 tsp Cinnamon
1/4 cup Nutella spread
60 gm Caster Sugar
Icing sugar for dusting {or make a glaze}


Procedure:
In a small bowl, dissolve yeast in warm milk and keep aside for 10 minutes.

In a large bowl add flour, salt, oil, egg and sugar together. Make a well in between and add milk in the middle mixing slowly together. Once they are evenly mixed together, start kneading until it becomes soft and flexible.

Place the dough ball in well greased bowl covered with cling for about 2 hours or until it is doubled in volume. 

knock down the dough and divide it into 2 parts: for rolls and bread ( you could make all rolls too or just half the recipe)

for rolls:

Roll out the dough in rectangle for about half an inch of thickness.

Spread butter and sprinkle cinnamon and sugar uniformly.

Starting at one end, tightly roll the dough keeping seam down. pinch the seam lightly to make sure it does not break open in between.

With a metal scraper or a serrated knife, cut about 1 or 1.5 inch sections.

Arrange them in well greased pan and cover with cling to rest for about another 30 minutes. 

Preheat oven to 350 Degree F (180 degree C). Bake for 20 - 25 mins or until the top is beautifully browned.


For the babka bread:

Roll out the dough in rectangle for about half an inch of thickness.

Spread butter and Nutella. Sprinkle cinnamon and sugar uniformly.

Starting at one end, tightly roll the dough keeping seam down. pinch the seam lightly to make sure it does not break open in between.

With a metal scraper or a serrated knife, cut in the middle to make two sections and leaving them joint at one end.

Roll each section outwards in a twist and and then twist them together in a braid formation.

Settle them in well greased tray or you could use loaf pan) and cover with cling to rest for about another 30 minutes. 

Preheat oven to 350 Degree F (180 degree C). Bake for 20 - 25 mins or until the top is beautifully browned.


Yum

Monday, March 16, 2015

Classic Victorian Sponge with Fresh Cream and Strawberries

If we were to not consider the freak weather that is going on in Delhi, I'd say we are well into the summers here. Only these unexpected downpours don't let the sun to be dominant. But its the matter of few days and I am already dreading the summers.

Classic Victoria Sponge with Fresh Cream and strawberries

We have already started making changes in our diet. Believe me, Delhi summers are not something you joke about. With the temperature soaring to 48 degrees Celsius, we are well part of a big bad oven.

Victorian sponge cake with fresh cream and strawberry was also done to keep things lighter at home after dinner. This turned out be a very nice and airy light sponge with wholesome of cold sweet whipped cream and fresh fresh strawberries.

Classic Victoria Sponge with Fresh Cream and strawberries

It is also an adieu to fresh strawberries from the market. Even though there are lots of it still available in the market the sweet taste is lost somewhere.

These ones get bad even before ripening and have no sweetness to it. So for me its done for this season.But not before we had our fill with a cheesecake, strawberry cobbler and our favorite preserve.
Oh and a bag full in freezer to use later in summer :)

Classic Victoria Sponge with Fresh Cream and strawberries

The recipe was adapted from: Jamie Oliver


Recipe follows:

For the sponge: 

226 gms / 4 Large Egg
226 gms Self Rising Flour
226 gms Unsalted Butter
1 Tsp Pure Vanilla Extract

Additional:

1 Cup Amul Fresh Cream
3 Tbsp of condensed milk {or your desired sweetener}
Lots of Strawberries { 450 gms}, hulled and halved
Icing sugar for dusting

Strawberry jam (Optional)

Procedure:

Preheat oven to 350 Degree F (180 degree C). Grease and line two 8 - inch cake pans.

In a small bowl, sieve the flour.

In a large bowl beat butter and sugar on medium speed until soft and creamy.

Add eggs one by one. Scrape down the sides, add vanilla beating for few more minutes.

Putting speed on low put flour into the batter. Divide the batter evenly into prepared pan and bake for about 20 minutes or light golden brown or until toothpick comes out clean.

Let the cakes cool at the room temperature.

For the cream: Put your tetra, whisk blades and mixing bowl in freezer for about 10 minutes before start.
Beat cream and condensed milk on high speed until it reaches soft peak stage. It should take about 10 -15 minutes.

Hull and half strawberries keeping aside few to decorate.

For assembling: Place one cake layer on the serving plate and level the cake if required.
Spread whipped cream and place halved strawberries all around the cake in circular pattern.

*Note:At this point you can drizzle strawberry jam over the fruit to add more sweetness. (I'd left it out because no one likes sweet cakes at our home )

Put the remaining layer on top of it to make a sandwich.

Garnish with strawberries and sprinkle with icing sugar to decorate.

Cover and refrigerate the cake. Leave out in room temperature for a while before serving.


Yum

Wednesday, March 11, 2015

Crispy Baked Potatoes

I can't say I have much to complain recently. I have so much to share but not enough time.

Crispy Baked Potatoes

After I announced my new venture, I haven't really done much to share more interesting news.
We participated in a lifestyle mela ~ All That Jingalala last month and to do so I realized that I have to up my game from just being a home baker to home based bakery. Which also meant that I had to buy new things - a lot of them! YIPPY!

LoveThemPeaches


And in the middle of this craziness, I have to feed my little one too. Something minus sugar please for my sanity. Her oven instincts are now developing, each 'ding' means a new cake and her spoon's out.

So I did some pinterest soul searching and created this beautiful plate which was finished as soon as I returned with some mayonnaise. It's a very versatile recipe. You can add anything over it and create a mini meal.

Crispy Baked Potatoes

Recipe follows:

2 Medium Potatoes
1 Tbsp Olive Oil
2 Cloves of garlic, thinly sliced
Sea Salt - to taste
Black Pepper - to taste
1/2 Tsp Dried Sage
Mozzarella Cheese, grated
Greens from Green Onion (Optional)

Procedure:

Preheat oven to 400 degree F (Approx. 200 degree C).

Wash  and scrub the potatoes clean leaving the skin on. Slice them very thin.

Mix Olive oil, salt, garlic, black pepper, dried sage in a large bowl.

Put potatoes in the same bowl and make sure each slice is coated. Place them on a plate in a circular overlapping pattern. ( I used pizza tray)

Bake them for about 20 - 25 minutes until they are crispy on outside and soft on inside.

You can add shredded mozzarella or cheddar and green onions 5 minutes before the oven says ding. :)


Yum

Wednesday, February 4, 2015

Strawberry Shortcake Cobbler

Its either the month of red or abundance of strawberry in the market that has desserts overflowing in my kitchen. I sometimes have to stop my cousins back from work to give away extra love :P

Strawberry Shortcake Cobbler

I think I may have to enroll myself to a gymnasium. I won't be indulging in how I'm hitting the realizing point, but that scary word which starts with an F and ends with T, this is where I'm heading too and it's daunting.

Sometimes I wonder how everyone who don't hit the gym choose to stay fit in the city. I am looking for ways to do so and any suggestions are welcome.

And to that thought, we must not waste this beautiful cobbler. Its yummy certified by Ozzy :)


This recipe was sourced from Recipe Girl

Recipe follows:

1 Cup All Purpose Flour
1 Cup Cornmeal
3/4 cup Sugar, divided
2 Tsp Baking Powder
6 Tbsp Butter, cold and cubed { I used salted and omitted Salt from the recipe}
1 Large Egg
1/2 Cup Milk, {I used toned milk}
450 Gms Strawberries, hulled and sliced
2 Tbsp fresh lemon juice
1 Tbsp Cornstarch

Procedure:

Preheat oven to 375 Degree F (190 degree C). Grease a pie dish.

Combine Strawberries, lemon juice, cornstarch and 1/4 cup of sugar in a bowl and let it sit for 15 - 20 minutes.

In another bowl, mix flour, cornmeal, baking powder and cubed butter. With your hands, lightly mix them together until it is incorporated. or you could use a pastry cutter to mix butter into flour.

Whisk an egg and milk together in a small bowl and add it to the pastry mix.

Scrape all of the strawberries and juices to the prepared pie dish and add spoonful of pastry mix on top of it to cover.

Bake for 25 - 30 minutes or until the top is golden brown and strawberry juice is bubbling on the sides.

Let it sit for 10 - 15 minutes to cool.

Serve warm with an ice-cream or whipped cream :)

Yum

Monday, January 26, 2015

Plum Swirl Cheesecake

Its a beautiful start of year 2015. The things are taking beautiful meaning and more importantly the move was not as bad as I was dreading it to be. This month flew by right in front of our eyes and we could do nothing. Almost nothing is what I meant.

Plum Swirl Cheesecake

The next month's anticipation has already started and soon the air will be filled with everything red and all the food blogs with strawberries. 

Plum Swirl Cheesecake

I have this perfect cheesecake for who do not like very sweet deserts. The plum preserve adds the right amount of sweetness and the tartness, ohh yumm! Annndddd its Red!

What all was I saying about filling skies with red and love? 
It's Plum swirl cheesecake!

Plum Swirl Cheesecake


Recipe follows:

For the Base:
12-14 Digestive Biscuits
4 Tbsp Melted Butter
2 Tbsp Granulated Sugar (Optional)

For the Cake:
1 Cup Cream cheese
3/4 Cup Heavy Cream
2 Tbsp Water {normal temp}
2 Tsp Gelatin
1/8 Cup Condensed Milk or Desired Sweetness

For the Topping:
Plum Preserve  {or any other as you desire}

Procedure:

Preheat oven to 350 Degree F (170 degree C) and grease eight inch spring form pan.

Crush digestive biscuits to fine crumbs, add sugar (optional) and melted butter to it. Press down the crumbs to a greased spring form dish.

Bake for 8-10 minutes until light brown.

Soak Gelatin in water for 2 minutes and melt on double boiler.

On a medium speed, whip heavy cream until it reaches soft peaks stage. Add condensed milk or desired sweetness.

Add melted gelatin and mix cream cheese beating the mixture until smooth.

Pour this mixture to the biscuit base. Add plum preserve randomly and give it a swirl by moving a skewer around. Refrigerate until firm. (Minimum of 4 hours till overnight)

Move cake mixture to fridge from chiller for 30 min before serving.

Yum

Friday, January 2, 2015

An Announcement ~ Love them Peaches!

Since the beginning of December, I'm in my hometown Delhi trying to get a handle on my 'dream come true' venture. I've been running all over to get everything just perfect!

For once I have complete checklists and yet I make numerous rounds to the same market for different things. I need some lessons in organizing my time. Any recommendations are welcome.


However, this post is not about me whining but about this amazing thing we achieved in just less then a month. Thanks to my loving family, for it would have not been possible without their time and effort.

My Sister gave life to an idea for our branding and my dear husband made our website - oh such a beautiful website!

I am happy to announce that Recipefollows is now taking orders for all the creations done on this blog and some more. All the details are there on our website. For daily updates please follow Facebook and Twitter.

Yay for me!

Yum

Thursday, January 1, 2015

Spiced Apple & Pear Loaves

After years I'm again back in Delhi and loving the winters. I've always been winter lover and my craze for hills starts from here. Majority of my days goes in planning our next trip before Ozzy's school start and our vacation gets limited. All I want to do is to go to The Himalayas without a return ticket...

Spiced Apple & Pear Loaves

While we all love to day dream, there are still some things to line up. Its a part of moving cities woes.

Spiced Apple & Pear Loaves

And meanwhile that's been done, I made these amazing loaves and used the left over batter for muffins. The spices worked so well with Apple and Pear, it was the perfect winter blend with hot cuppa of tea.

Spiced Apple & Pear Loaves


This recipe was sourced from The Kitchn.

Recipe follows:

1 Cup All Purpose Flour
1 Cup Whole Wheat Flour
1/4 Cup White Castor Sugar
1/2 Cup Packed Brown Sugar
2 Eggs
1 Stick Softened Butter { I used with salt Amul butter and not added Salt}
2 Tsp Baking Powder
1 Tsp Pure Vanilla Extract
2 Tsp Cinnamon Powder
1/2 Tsp Instant Coffee 
1/2 Tsp Ground Ginger
1/4 Tsp Nutmeg
1/2 Cup Milk
2 1/2 Cup Pear & Apples, cored, unpeeled & diced
1/2 Cup Roasted Nuts / Chocolate chips (Optional)
Cinnamon & Sugar to sprinkle on top

Procedure:

Preheat oven to 425 Degree F (220 degree C) and grease 9 inch loaf pan.

In a bowl, whisk the flour, baking powder, baking soda, cinnamon powder, coffee powder, walnuts and chocolate chips.

In another bowl beat butter and sugar on a medium speed until pale and fluffy. Add in the eggs one by one beating lightly. Mix in vanilla extract.

Lightly add dry ingredients to the batter, alternating with warm milk until mixed. (Alternate in batches so that you always start and end with flour) Do not over-mix.

Fold in diced apples and pear with a spatula to incorporate them to the batter. Divide the batter between loaf pans. Sprinkle cinnamon and sugar on top. 

Turn down the temperature to 400 degree F (200 degree C) and bake for about 20 - 25 minutes.
they are done when the top looks cracked and crusty, and the toothpick comes out clean.

Let it sit on wire rack for 10 minutes before serving.

Yum

Monday, December 22, 2014

#NovemberRoad comes to an end!

While I was determined to quit my job and start something I strongly believe in, I had some serious doubts about myself. Everyone in my family believed I could do it but I choose to believe that I will give up when pressure starts.


What is NovemberRoad?
It was a self challenge, more like Sid's challenge. 
It all started with an evening in my beautiful balcony and office's political debate. After listening to my endless cribbing, I landed myself into a challenge.
Sid thought I was ready to get over and move on, I wasn't so much. I had classics saved on my bookmarks without any intention of doing them anytime soon. For me if I have not covered the basics, I'm not ready to break any rules. Period. So moving on was a bit of an overwhelming thought. I was given an option to choose and complete 15 out of hundreds of the bookmarks I had saved in one month alone.

Is the project completed?
I still have 2 recipes to complete but the whole accomplishment of 13 recipes in a month with blog posts here had me over the moon. I never imagined that I will be doing them all in a months time, some in a same day...

Your learnings from the project.
Mind blocks are all they are, Nothing more! I came over that fear of failure and started believing in myself. 

Any regrets?
The only thing I regret was the timing of this beautiful project. I should have done it sooner, gotten over my mind blocks and planned properly. 

Conclusion 
The month of November is over but 2 recipes are still left untagged on the list. I have parts of tiramisu covered but due to unavailability of mascarpone around where I was living during that time left me in a rut. The second one is a cheesecake which was completed but was not posted on time. All thanks to the move from Pune to Delhi.


Yum

Sunday, November 30, 2014

#NovemberRoad - Corn, Red Pepper and Cheese Roulade

“We either make ourselves miserable, or we make ourselves strong. The amount of work is the same.” ― Carlos Castaneda

Corn, Red Pepper and Cheese Roulade

I'm munching on the leftover of this beautiful and yummiest stuffed bread I've ever eaten.
I may not have taken beautiful pictures because I was exhausted by the time this came out of the oven but it is YUM.

Melting cheese oozing out from cracks on the sides, this wasn't supposed to happen according to the recipe but gave it ever more the temptation to eat as fast as I could.

Corn, Red Pepper and Cheese Roulade


Can you imagine baking nonstop for NovemberRoad on the last day and being hungry? The aroma of corn mixed with melting cheese getting crispy on a hot baking tray...

Nope! Can't wait to get the pictures done and dive onto that tray...


Recipe follows:    

The recipe was sourced from Five and Spice


P.S. For NovemberRoad Project, all the recipes will be displayed as a link. I will not be writing about them until I make any changes to the same. Thanks.

Yum

#NovemberRoad - Banoffee Pie

“I'm not telling you it's going to be easy - I'm telling you it's going to be worth it.” ― Art Williams


Banoffee Pie

I had no clue what Banoffee Pie was until a friend from Delhi called to tell me that I owe her a treat on her Birthday (which she happens to share with Sid) since I have started this blog.

Banoffee Pie

I started searching immediately and found this website with the prettiest Banoffee Pie pictures. In Chef Curtis words Banoffee is a Banana and Toffee Pie!

Yeah so back to the recipe, this one turned out to be the show winner. Everyone at home loved it and I had enough left over to serve my friends who came to give me a farewell. Tonight also happens to be the last night at our lovely hill view apartment. Nostalgia is in air...

Banoffee Pie


Recipe follows:    

The recipe was sourced from Curtis Stone


P.S. For NovemberRoad Project, all the recipes will be displayed as a link. I will not be writing about them until I make any changes to the same. Thanks.


Yum

Friday, November 28, 2014

#NovemberRoad - Classic Apple Pie

"I think fearless is having fears but jumping anyway." -Taylor Swift

I did it! I did it!
You wont believe what I did today!

Classic Apple Pie

For years and years of reading the same recipe in almost all the cookbooks and blogs, I know it by heart now. The only thing was the fear of not getting the crust right.

I have heard too many comments about 'not flaky enough' or 'a soggy shell' that the scare of being a failure stopped me from even trying it once. Especially when I'm living with a pie lover. He must have eaten Apple Pie in almost every bakery its available. Even when I'm not around, he makes sure to send me a picture of the one saying "I'm still waiting for the right one!"

Classic Apple Pie

I guess I'll assume it was the right one as all I hear about is having one more slice before sleeping. 3 slices in a day is good right? And a major block lifted!

To think of it, this project has given me freedom from fifteen mind blocks and I am loving it. I would be loving it even more if I complete it on time. With moving cities, and Ozzy at home watching videos on my laptop instead of me writing my post, it just seems to be getting bigger challenge than expected.

Classic Apple Pie

I have 2 days left and 4 more recipes to go...sigh! 


Recipe follows:    


The recipe was sourced from Sprinkle Bakes


P.S. For NovemberRoad Project, all the recipes will be displayed as a link. I will not be writing about them until I make any changes to the same. Thanks.

Yum

Thursday, November 27, 2014

#NovemberRoad - Rainbow Thumbprint Cookies

For the gate is small and the way is narrow that leads to life, and there are few who find it. - Matthew 7:14-16New American Standard Bible (NASB)

Rainbow Thumbprint Cookies

Do you remember eating thumbprint cookies when you were just a kid? These cookies were the highlight of my day after school. I used to come back home to a glass full of milk (meh) and cookies like a ritual and I always would start with scratching the jam first.

When I told Sid about my ritual, surprisingly he used to scratch the jam first too. It seems like a universal act to do because I noticed Ozzy doing the same! Wah!

Rainbow Thumbprint Cookies


I may have confessed to many things on my blog but I don't think I have ever spoken about my fear of baking cookies. They never seem to come right.

But now they do! Maybe because I'm baking more frequent or maybe its just the letting go of the frustration and doing it without thinking about its failure. whatever it is, it seems to be working.

Rainbow Thumbprint Cookies


These cookies came out so pretty. Ozzy could not wait to get her hands on!


Recipe follows:    

The recipe was sourced from Love and Olive Oil

I just rolled them in a bowl full of sprinkles to create Rainbow effect.

Also used homemade Plum preserve in the middle of these pretty cookies.


P.S. For NovemberRoad Project, all the recipes will be displayed as a link. I will not be writing about them until I make any changes to the same. Thanks.

Yum

Wednesday, November 26, 2014

#NovemberRoad - Almond Coconut Chocolate Scones

“Take pride in how far you've come. Have faith in how far you can go. But don't forget to enjoy the journey" -  Michael Josephson

Almond Coconut Chocolate Scones

Scones on my list! oh yeah! I love breakfasts, fancy breakfast but only at hotels. I don't make them at home but if served to me, I take the largest portion thinking I'll skip the lunch (sometimes I do, don't judge).

Almond Coconut Chocolate Scones

they only problem is that we at home have very limited options when it comes to breakfast. scrambled, french toast, omelette, did I say scrambled?
You get the gist?

Almond Coconut Chocolate Scones

This is why I'm trying to check out newer options. Scones were bookmarked because I am forever thinking of changing our breakfast menu and it never happens. Maybe now we look towards adding one more thing to 'limited ways to eat an egg'.

Almond Coconut Chocolate Scones


Recipe follows:    

The recipe was sourced from Joy The Baker


P.S. For NovemberRoad Project, all the recipes will be displayed as a link. I will not be writing about them until I make any changes to the same. Thanks.


Yum

Tuesday, November 25, 2014

#NovemberRoad - Pineapple Upside Down Cake

“Healing doesn't mean the damage never existed. It means the damage no longer controls your life”― Akshay Dubey

Pineapple Upside Down Cake

I think I was in love with this cake until I had Pineapple upside down cake out of the oven and the aroma was all over my kitchen and home.

Pineapple Upside Down Cake

These days Pineapples are all over Pune. There are cart full of the ripest ones available in every lane and corner. Its a family favorite fruit (which is very rare) and I had to shoo away various attempts to steal slices every few minutes. I knew any further delay to this cake and I will have to make another run to the market for the fruit alone. That was motivation enough to get this cake off my list. 

Pineapple Upside Down Cake

The recipe procedure sounds complex, but its hardly any. The only tip I would give here is to make sure that you read the full recipe before starting and line everything in the right order, It will be a breeze to get this beautiful super soft and moist cake out of the oven. Did I say its quickly turning as my favorite...


Recipe follows:    

The recipe was sourced from Joy Of Baking


P.S. For NovemberRoad Project, all the recipes will be displayed as a link. I will not be writing about them until I make any changes to the same. Thanks.


Yum
Related Posts Plugin for WordPress, Blogger...